Share on:


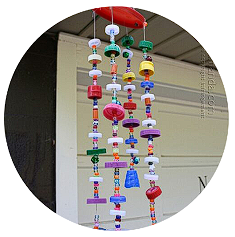
Recycled Plastic Lid Windchime
Author: Amanda Formaro
Category: Plastic
Published: 03/08/2022
Supplies
- 1 large (sturdy lid)
- Lots of plastic lids (water bottles, milk jugs, soda bottles, etc)
- A few cup type lids (from medicine bottles, lids from hair mousse, whipped cream, etc)
- Colorful pony beads
- Jingle bells
- String
- Tools: thimble (flat nose pliers, hammer, nail, needle)
Instructions
- Use the hammer and nail to make four holes (like a plus sign) in the large lid. Set the lid aside.
- Thread needle with a piece of string. The amount of string you use is up to you, it just depends on how long you want your chimes to be!
- Thread the needle through one bead. Tie a few knots around that bead at the end of the string.
- Poke the needle through center of the inside of a plastic lid. * Pull the needle through, pushing the plastic lid all the way to the end, touching the bead.
- Add several beads and an occasional jingle bell to the string and push them to the end.
- Add another plastic lid, pushing it to the end.
- Continue with steps 5 and 6 until you have reached the length you like.
- Poke the needle through one of the holes you made in the large lid in step 1.
- Tie a knot a few times and trim off the excess string.
- Repeat steps 2-9 three more times.
- To make the hanger, use a hammer and nail to poke two more holes in the large lid, across from each other.
- Thread a needle with string and tie a bead to the end. Poke it through one of the new holes in the large lid and pull it through the top. The bead will stop it from coming out the other side.
- Poke the needle back down through the second hole and pull it snug. Pull the string out as long as you want the hanger to be.
- To keep the hanger at that length, turn the lid over and tie a bead to that string to keep it in place. Trim any excess string.